Setting up and interacting with Lightning Network Daemon(LND) ⚡️ Part 1
Buying your first coffee on Lightning Network!

In the previous blog I wrote about how to run your own bitcoin node and make some transactions. Now let's catch up with the recent advancements in Bitcoin and learn about the Lightning Network. 🌠
Lightning Network is a Layer 2 solution that helps to scale bitcoin transactions and get them confirmed at a lightning speed. The Lightning Network Daemon (lnd) - is a complete implementation of a Lightning Network node that is capable of:
- creating channels
- closing channels
- managing all channel states
- maintaining a fully authenticated+validated channel graph.
- performing path finding within the network
- sending outgoing onion-encrypted payments through the network
- and much more...
I won't be getting much deep into the tech behind lightning network, as in this blog I want you to have some hands-on experience and enjoy a coffee bought on lightning network.
Installation ⬇️
There are multiple ways to install lnd. In this tutorial I'll walk you through the installation where we build a development version from the source.
Prerequisite for installing from source 🧑🏻💻
Since lnd is written in Go, you need to install Go to use it.
On Linux:
wget https://dl.google.com/go/go1.16.linux-amd64.tar.gz
sha256sum go1.16.linux-amd64.tar.gz | awk -F " " '{ print $1 }'
The command should print
013a489ebb3e24ef3d915abe5b94c3286c070dfe0818d5bca8108f1d6e8440d2

If it doesn't, then the target REPO HAS BEEN MODIFIED, and you shouldn't install this version of Go. If it matches, then proceed to install Go:
sudo tar -C /usr/local -xzf go1.16.linux-amd64.tar.gz
export PATH=$PATH:/usr/local/go/bin
Note: minimum version of Go supported is Go1.15
Now you should set your $GOPATH environment variable, which represents the path to your workspace. By default, $GOPATH is set to ~/go. You will also need to add $GOPATH/bin to your PATH. This ensures that your shell will be able to detect the binaries you install.
Add the following to your .bashrc file, so as to save it for every new terminal instance.
export GOPATH=~/gocode
export PATH=$PATH:$GOPATH/bin
Installing lnd from source ✔️
Once you are done with the prerequisites, let's begin with installing lnd, lncli, and all related dependencies.
git clone https://github.com/lightningnetwork/lnd
cd lnd
make install
In order to run, lnd requires, that the user specify a chain backend. Currently there are three available chain backends: btcd, neutrino & bitcoind.
We'll be using bitcoind for our case.
You need to update your bitcoin.conf to enable lnd to communicate with bitcoind.
Your bitcoin.conf file should have:
testnet=1
server=1
daemon=1
zmqpubrawblock=tcp://127.0.0.1:28332
zmqpubrawtx=tcp://127.0.0.1:28333
test.rpcport=8332
Refer this to learn more about the above options.
Still wondering about zmqpubrawblock? 🤔
We need ZeroMQ to know about the arrival of new blocks or transactions in bitcoind. The ZeroMQ facility implements a notification interface through a set of specific notifiers.
You need to provide some options to lnd too. Here also you have the choice to add them in lnd.conf file to prevent rewriting.
An ideal lnd.conf file should contain:
#for testnet
bitcoin.testnet=true
bitcoin.active=true
#set this for bitcoind chain backend
bitcoin.node=bitcoind
bitcoind.rpchost=127.0.0.1:8332
Running LND 🌋
Huh that was tough! But believe me your efforts will be worth it. 💪🏻
To start the lnd node, open a new terminal and enter the command lnd.
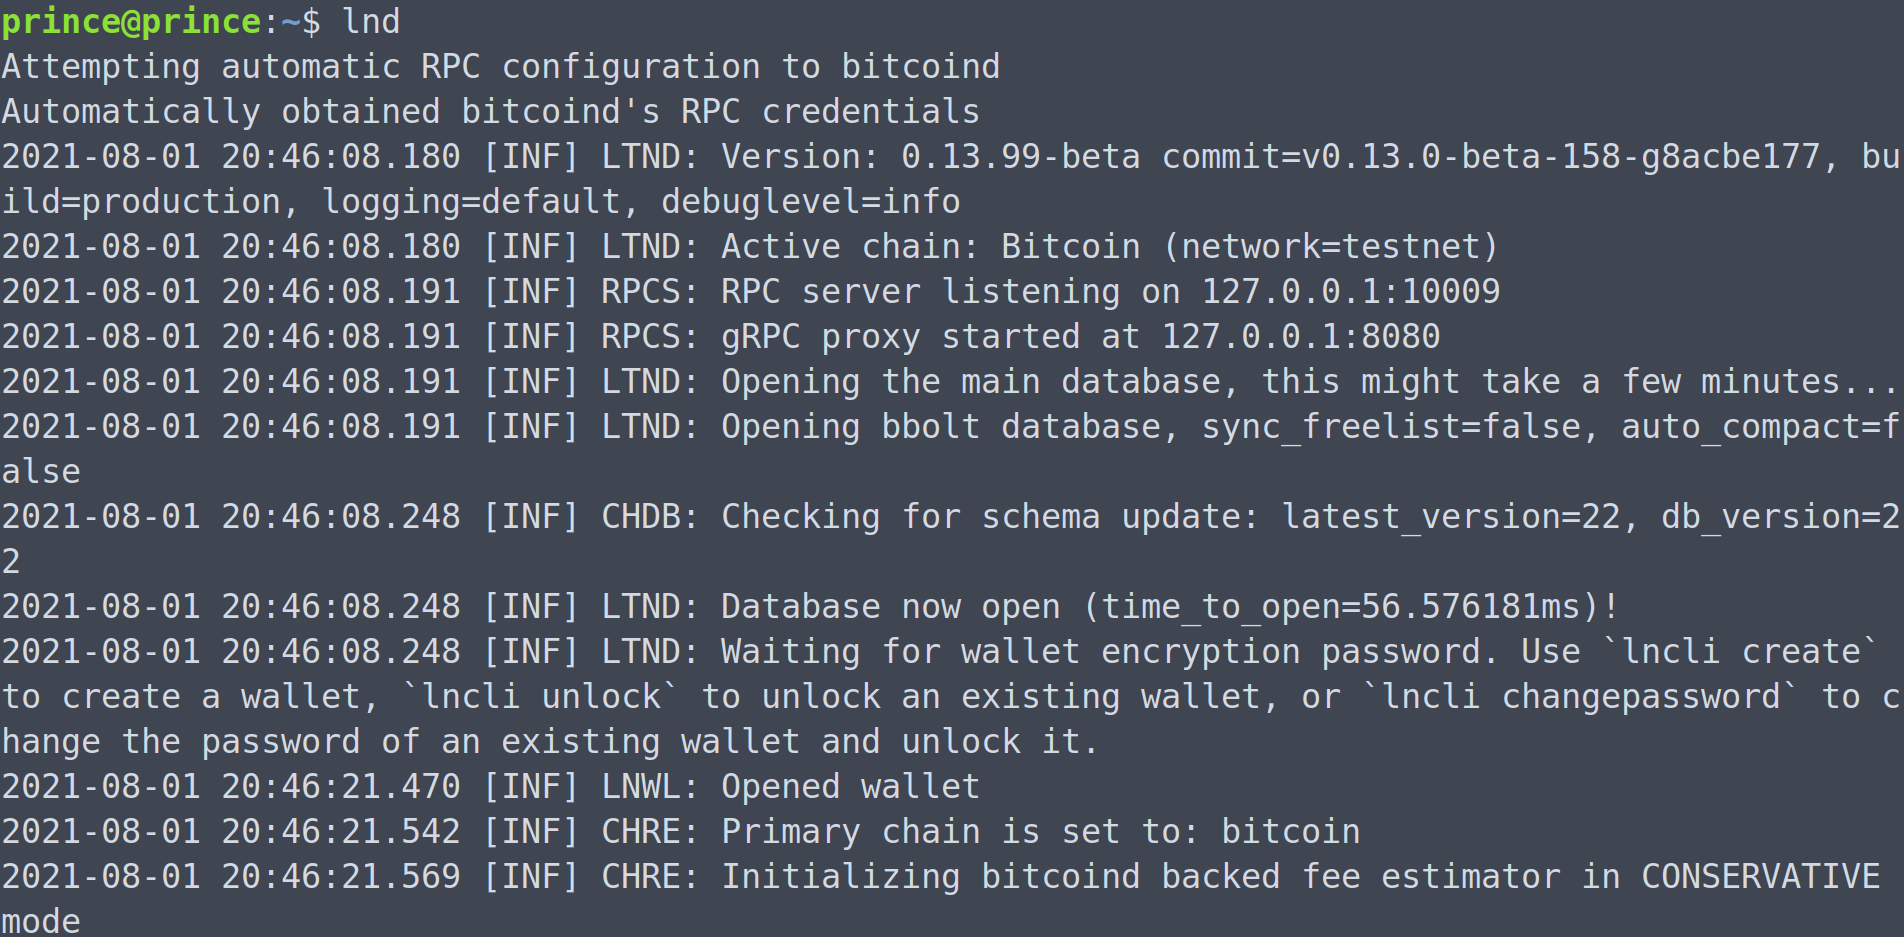
Note: Make sure you have bitcoind running in the background. Not sure how to do that? Check this .
If you see such a response, congrats you did it! 🎯 If not, then probably you missed something while setting up. I am always ready to help, just shoot your errors in the comments.
Interacting with LND 🧑🏻💻
Now that you have your lnd node up, lets create a wallet. Switch to a new terminal tab and hit:
lncli create
lncli unlock
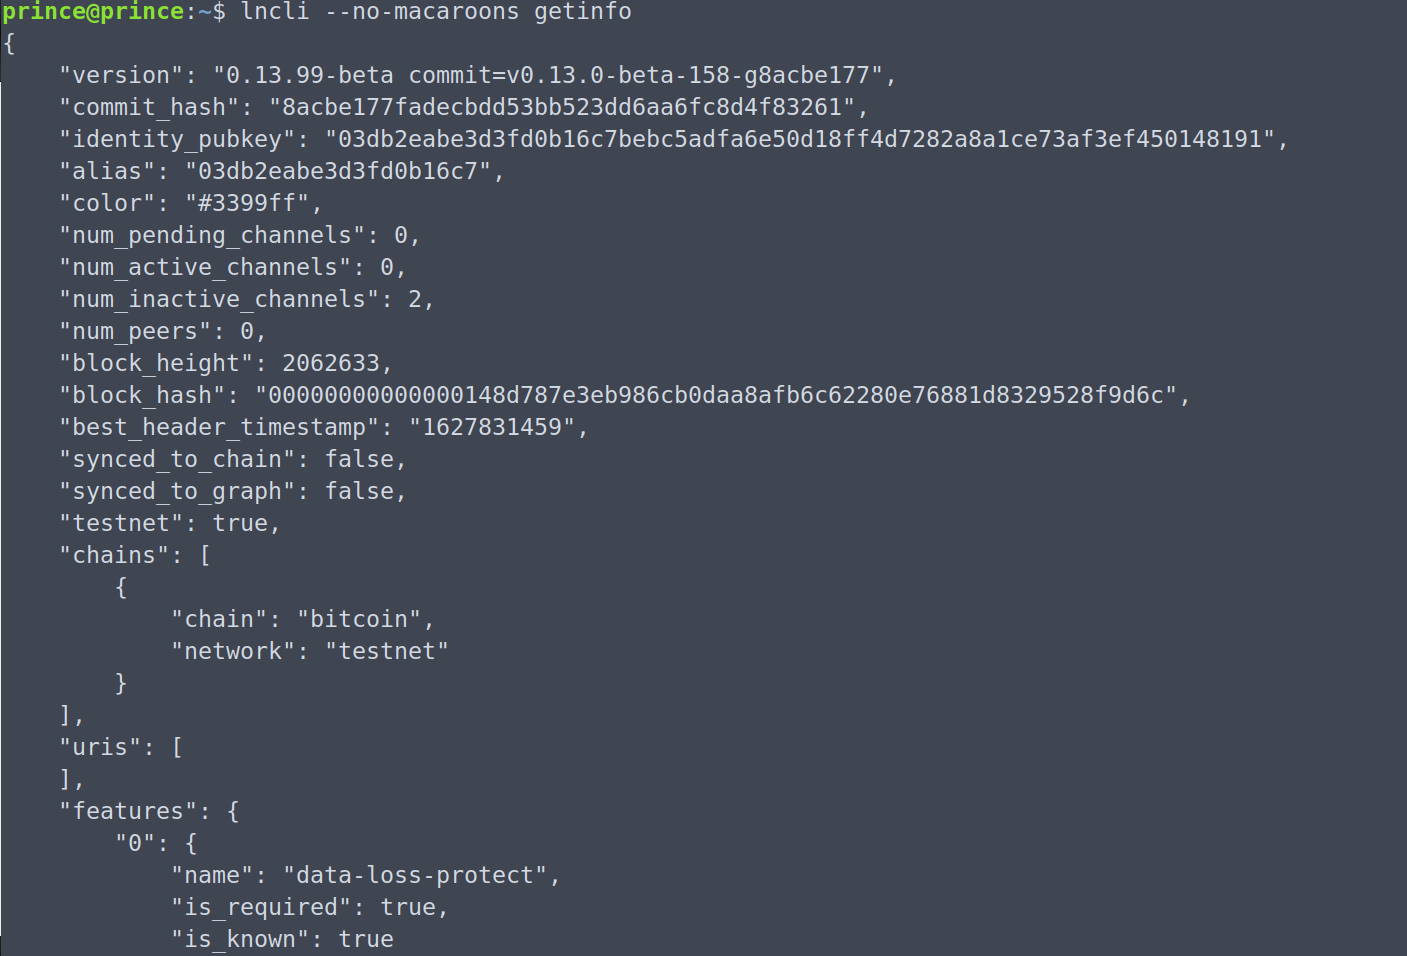
We use lncli command to interact with our node. Let's try to get our node info.
lncli getinfo
Boom! Error! 😵
[lncli] could not load global options: unable to read macaroon path
The error says that it is not able to read the macaroon path. Macaroons are Lnd's way to authenticate your node.
Running lnd for the first time will by default generate the admin.macaroon, read_only.macaroon, and macaroons.db files that are used to authenticate into lnd. They will be stored in the network directory (default: lnddir/data/chain/bitcoin/mainnet)
So this error could be resolved in two ways:
- Disble macaroons for testing purpose by passing --no-macaroons flag into both lnd and lncli
Add the macaroon path manually by passing
--adminmacaroonpathflag to lnd and--macaroonpathto lncli. For eg:--adminmacaroonpath=data/chain/bitcoin/testnet/admin.macaroon
So now when you hit the getinfo command you'll get all the data of your node like identity_pubkey, num_pending_channels, num_active_channels etc.
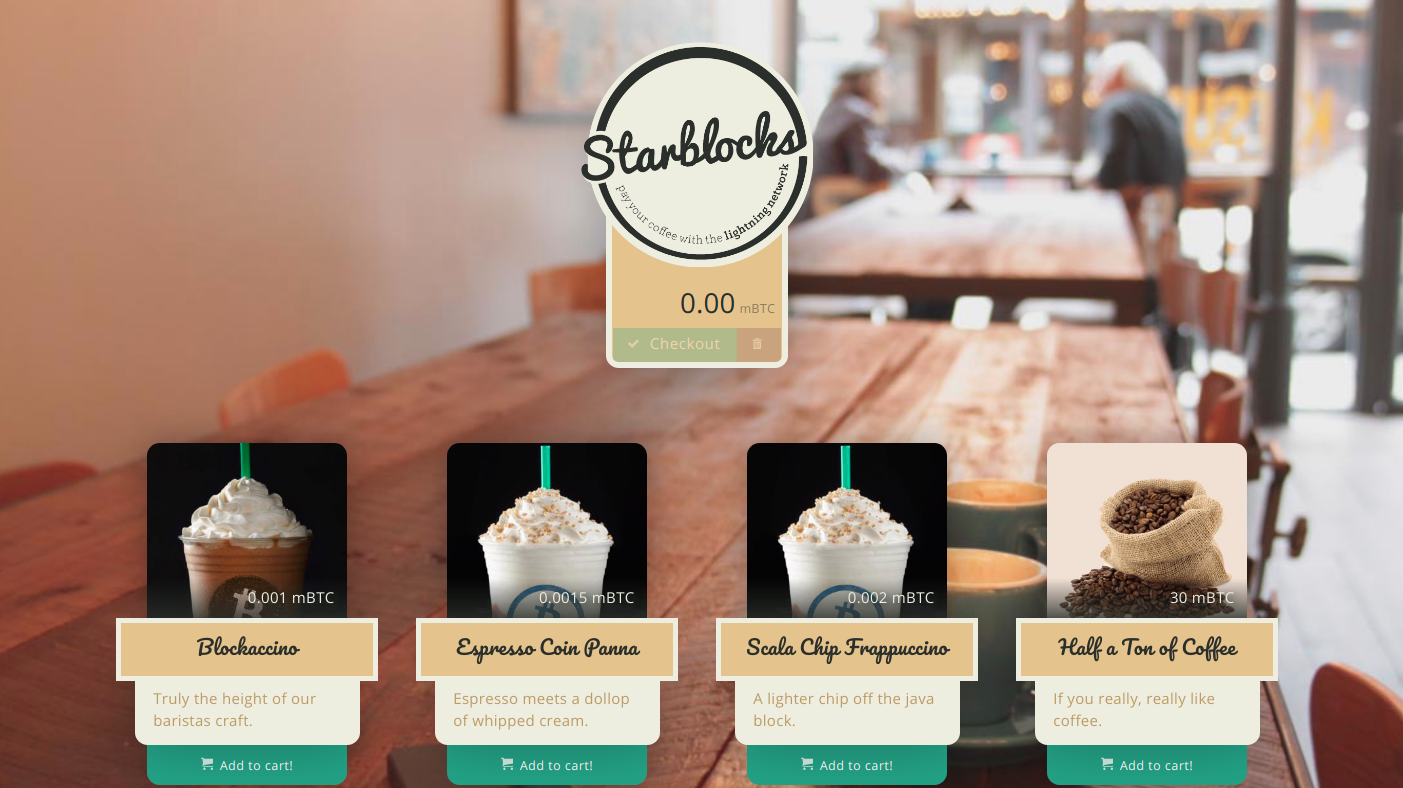
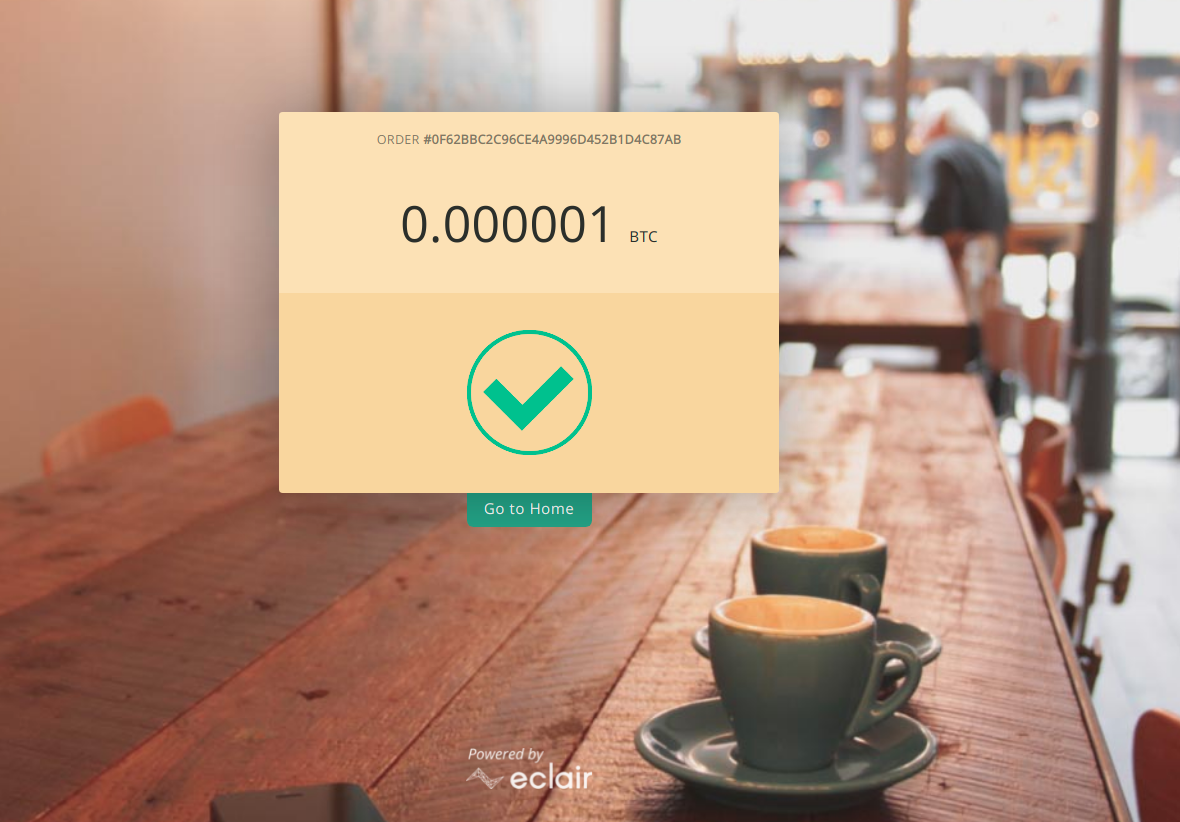
Buying a Coffee ☕️
Wanna really have a coffee at StarBlocks? Part 2 is on its way!